Welcome to the ninth installment of our introductory Rivenstone gameplay series. These blogs are meant to cover some of the basic rules of the game, giving you a taste of what the tabletop experience will be when the game launches later this year.
If you’re just joining us, you can find previous blogs exploring the gameplay as well as the fiction of Rivenstone on our website.
Be the first to know when we release our future posts in our gameplay blog series by signing up for our newsletter on our site and by following our social media accounts on Twitter, Facebook, and Instagram.
In today’s post, we are going to reveal the full warbands we are bringing to Adepticon in just two short weeks, and show you all of their model stat cards!

The Shattered Empire Warband

The Shattered Empire forces are being led by none other than the Grand Adjudicator himself, Belcroft. This fearsome warlord in his gleaming shard knight armor is joined by a Stone-Touched Knight as the other hero in this Scouting Party-sized warband.


These two heroes immediately establish this warband as leaning towards a defensive and resource denial style gameplan. Belcroft is an absolute menace to his opponent’s rivenstone shard economy. Not only does he lower the Ingenuity of nearby enemies, making it harder for them to harvest shards without suffering damage, but he has two different ways to remove shards from his opponent’s reservoir.
The knight, on the other hand, wants to find a defensible objective, plant his feet firmly on it, and dare his enemies to “come get some.” Both of these heroes unlock Shattered Empire Soldier Models as a follower type, which is what the rest of the warband will be filled out with.

The warband includes two musters of Line Troopers (for a total of 6 models) and a single muster of Line Fusiliers. The Line Troopers aren’t the hardest-hitting models by any means, but they are incredibly defensive, which plays well into the overall strategy of this warband. When the Stone-Touched Knight or Belcroft get into the perfect position to begin dominating the battlefield, the Line Troopers can help keep them safe from Orrix axes.
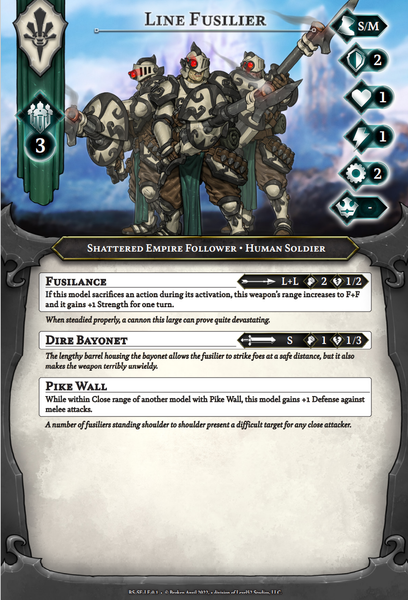
Line Fusiliers, on the other hand, can effectively threaten just about anywhere on the board that they can see. This trio of gunners can hang back on objectives and pick off enemies as they approach, making them a real danger that must be dealt with.

Finally, the warband is completed with the addition of a barracks. In this case, the Riven Aperture. Like all barracks, the Reinforce action is available, but it’s the Attune Energy unique ability that allows the typically slower Shattered Empire to gain ground further up the battlefield when they need it.
The Orrix Warband

Over at the opposing force, Tor leads the charge of the brutal Orrix as they make their way to the demo tables. The hunt master is joined by a Battle Master as the heroes for the Orrix warband. Whereas the Shattered Empire force wants to play a more defensive strategy, a quick look at the Orrix stat cards makes their strategy quickly apparent: Destroy. Everything.


Tor is an absolute beast (no pun intended) of a hero, capable of killing just about anything he sets his mind to. However, Tor cannot wade into battle without precaution, or else he himself will fall beneath his enemies’ blades and give up four victory points. Tor is best used as a hit-and-run style threat, sprinting around the board and keeping the pressure on his opponent’s forces at all times. The Battle Master is no slouch in combat either, and also provides some much-needed warband support thanks to his Expert Commander ability, which allows him to clear exhaustion tokens from followers earlier than normal each round.
Tor unlocks Orrix Scouts and Orrix Beasts, while the Battle Master unlocks Orrix Soldiers. This warband isn’t bringing any Carnateryx, so it won’t be using that Beast keyword, but the other two keywords are being used.


This warband includes two musters of Brutes (for a total of four models) and a single muster of Flingers. While the Flingers have a solid ranged attack, its likely that in this warband they will primarily be used to harvest rivenstone thanks to their great mobility and average Ingenuity.
The Brutes are primarily here to beat faces and hold objectives, but in a pinch they’re also not bad at harvesting. Even though they have a low Ingenuity of 1, they have 2 Health, which means they can afford to flub at least one harvesting roll without killing themselves.

Finally, the warband is completed with the addition of the Ancient Gateway barracks. This barracks not only Reinforces, but features the Ambush ability, a cornerstone of any good Orrix strategy. When followers begin to fall, this barracks always allows the Orrix the opportunity to get back into the fight just about anywhere on the battlefield.