Welcome to the lucky thirteenth installment of our introductory Rivenstone gameplay series. These blogs are meant to cover some of the basic rules of the game, giving you a taste of what the tabletop experience will be when the game launches later this year.
If you’re just joining us, you can find previous blogs exploring the gameplay as well as the fiction of Rivenstone on our website.
Be the first to know when we release our future posts in our gameplay blog series by signing up for our newsletter on our site and by following our social media accounts on Twitter, Facebook, and Instagram.
We’ve covered the stat cards for all the models found in the four starter boxes that will be available at launch, and now it’s time we take a look at some of the additional heroes and followers you will be able to get separately to add to your warband. In this blog we’ll start with the Shattered Empire and Orrix models, and next post we’ll take a look at Iron Guard, Risen, and Wild.

Shattered Empire Add-Ons

(click to enlarge)

(click to enlarge)
If you’re a fan of the Shard Knight armor that Grand Adjudicator Belcroft wears into battle, and want to see more of it on your tabletop, then I have some good news for you!
Shard Knights are powerful non-character champions that play very differently than Belcroft. Whereas the Grand Adjudicator is a menace to your opponent’s shard gathering economy, Shard Knights are front-line beaters with loads of versatility. They hit hard, they’re insanely durable, they can move your followers into better positions, and with enough planning, they can score you a ton of victory points.
Shard Knights’ main drawback is how hard of a tempo swing you suffer when they are destroyed. Not only does their destruction completely shut down any investment you put into scoring victory points via Mark of Conquest, but it gives a solid three victory points to your opponent. Learning when and where to commit your Shard Knight to action is key to getting the most out of them.

(click to enlarge)

(click to enlarge)
In stark contrast to the durable and hard-hitting Shard Knight is the Patrol Runner. This hero is, without question, the fastest model releasing with Rivenstone, but also one of the least durable. Patrol runners are excellent at harassing the enemy from a distance, and can threaten to do so just about anywhere on the table.
Like many Shattered Empire heroes, the Patrol Runner scores victory points based on table presence / board control. Specifically, the Runner wants to camp the enemy barracks, which she can often get to in a single turn of running and leaping.
Once the Patrol Runner is in your position, you pose a tough question to your opponent: Do they turn around and allocate resources to killing the Patrol Runner behind them, or do they risk the Patrol Runner activating and continuing to rack up victory points off of their barracks as they focus their attention elsewhere?

(click to enlarge)
Wardens are a no-nonsense follower group that plays to the defensive strengths of Shattered Empire warbands in a very different way than Line Troopers. Whereas Line Troopers are innately Defense 3, and can help protect your heroes from enemy melee attacks, Wardens are situationally Defense 3, with the ability to damage an enemy just for swinging at them.
If you’re planning to play your Shattered Empire a bit more aggressively, and want to bring the fight to your opponent instead of trying to weather the shots and hold your ground, it’s worth considering a few groups of Wardens in your warband.
Orrix Add-Ons

(click to enlarge)

(click to enlarge)
The first thing you might notice when reviewing the Sabrefang Dragoon is that its Bounty score is 4, the exact same as Tor. This is because the Dragoon is just as deadly as Tor, though it approaches combat in a different manner.
Tor excels at hit-and-run tactics where he singles out an enemy hero, dishes out a load of damage on them, then runs away to a safe distance. The Dragoon, on the other hand, crushes enemies in melee and wants to kill multiple models in a single turn instead of just a single hero. Thanks to its high mobility, the Dragoon can explode out of your ranks and crash headlong into the flanks of your opponent’s warband, picking off their followers for a quick victory point score while maintaining a safe distance from enemy threats.
The Dragoon is also one of the only heroes whose Health increases when he infuses. Going from Defense 3 Health 8 to Defense 4 Health 10 is a huge swing in durability, and makes this a hero you want to infuse as quickly as possible.
(click to enlarge)

(click to enlarge)
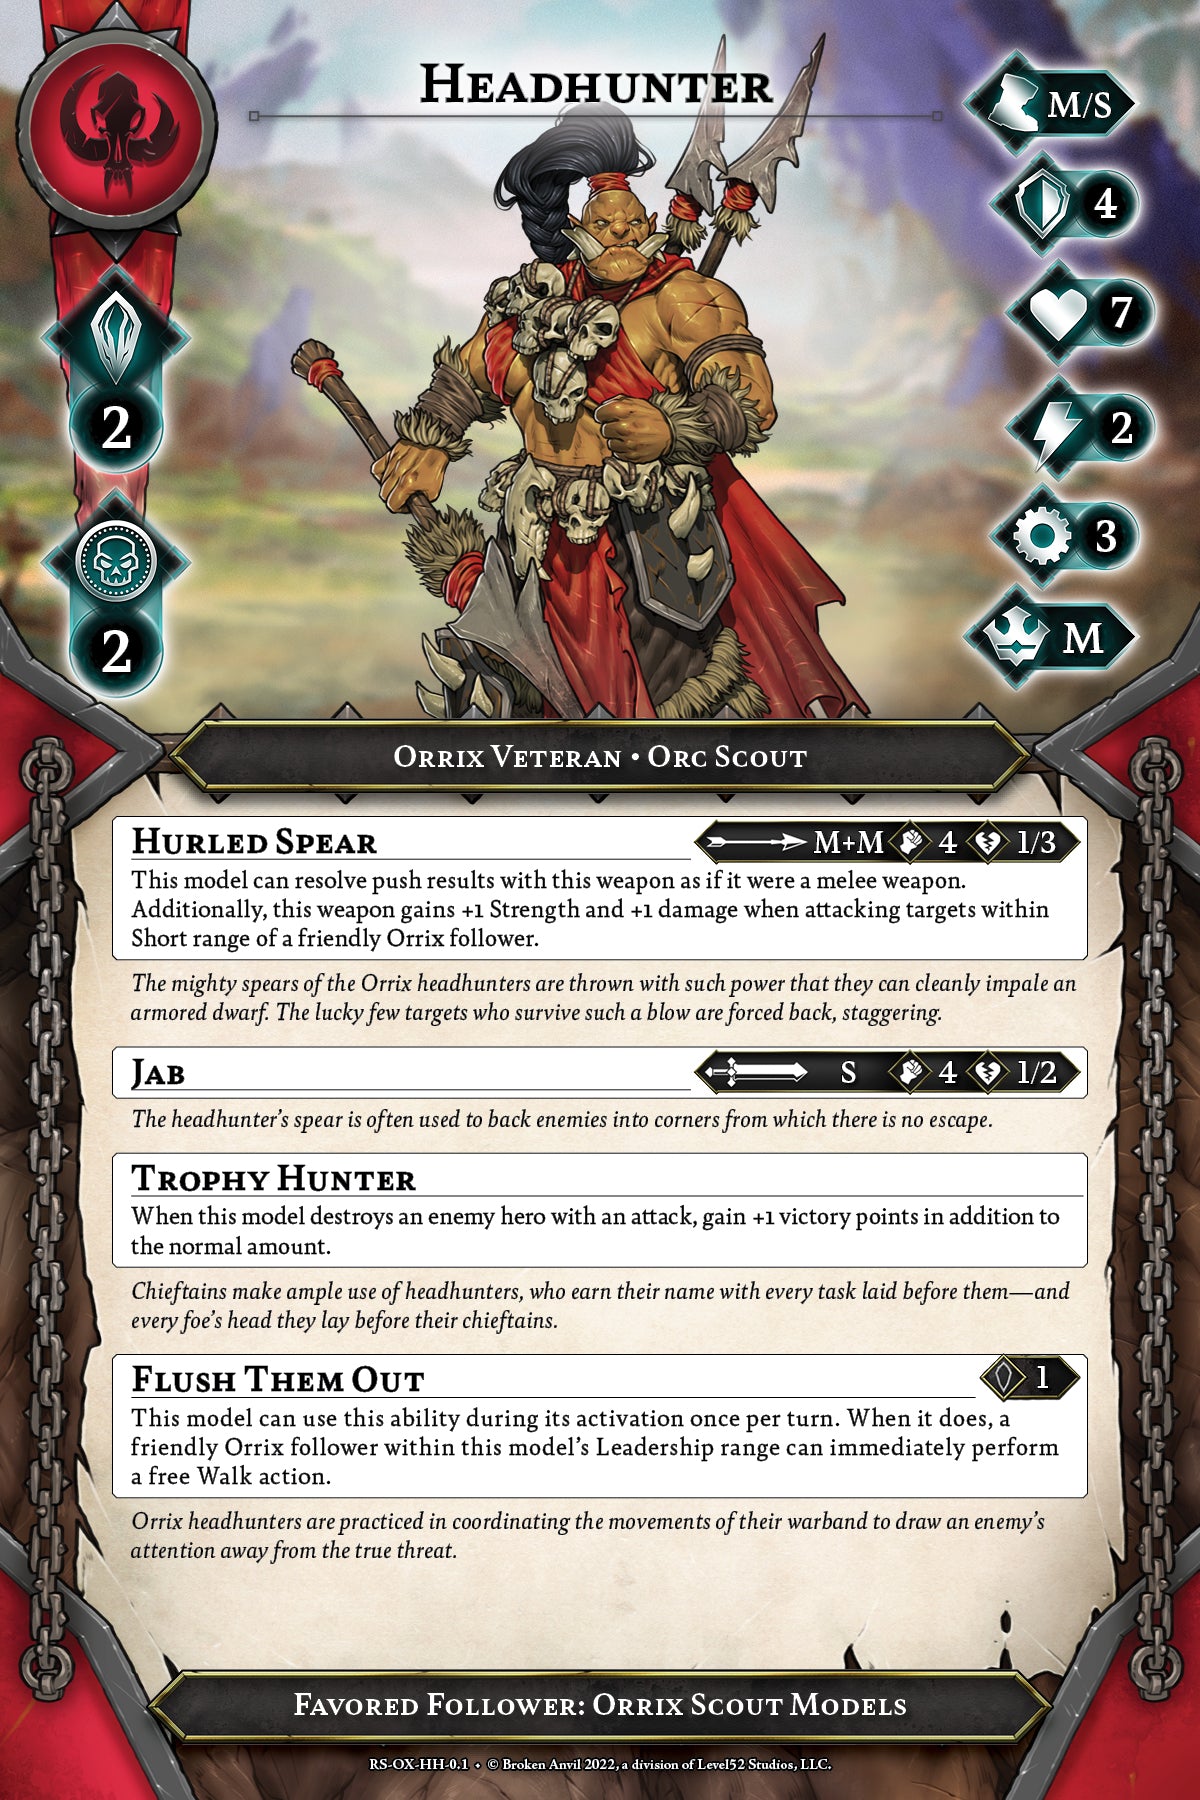
The Headhunter might just be the purest expression of the Orrix strategy. She scores more victory points when she kills enemy heroes, which already scores victory points. In other words, she just wants to kill stuff.
Headhunters are incredibly deadly veterans, especially when infused, thanks to the additional Strength and Damage they can gain on their missile attack. A Strength 5 Damage 3/5 attack is brutal, and there are rare fews models in the game that withstand a sustained barrage of spear attacks.
Headhunters are veterans with a Bounty of 2, making them a priority target for your opponent. Running a Headhunter alongside Tor allows you to prevent the enemy from taking Cover thanks to Tor’s Bird’s Eye ability, which can really help ensure the Headhunter’s deadly attacks land as accurately as possible.

(click to enlarge)
Murder-birds, or as they are formally known, Carnateryx, are incredibly mobile followers that can support each other when hunting in a pack or your other models attacking enemies near them. With a Speed of Long/Medium and Flight, these vicious little beasties can fly just about anywhere on the battlefield that they please.
This makes Carnateryx excellent objective holders later in a round, when they can rush up and try to snatch a few objectives from your opponent. You’ll notice that they don’t have an Ingenuity score, and this is one of the bigger drawbacks for these beasts.
A model without an Ingenuity score can’t attempt any rolls that use that score, meaning Carnateryx cannot harvest rivenstone shards in any way, nor can they interact with scenario elements that require Interaction rolls. If you’re going to include some Carnateryx in your warband, make sure you bring another follower group capable of mining some rivenstone shards for your models to consume as needed.
Thank you for joining us for this week’s installment of the gameplay blog series. Join us again next week as we dive further into more rules!